Installation guidance checked against current Ella's Bubbles installation and electrical support materials, KOHLER Walk-In Bath resources and American Standard walk-in bath documentation. Exact rough-in dimensions, drain configuration, circuit count, fastening and warranty requirements vary by model and local code.
A walk-in tub can look deceptively simple on a showroom floor: one large fixture, one doorway, one faucet.
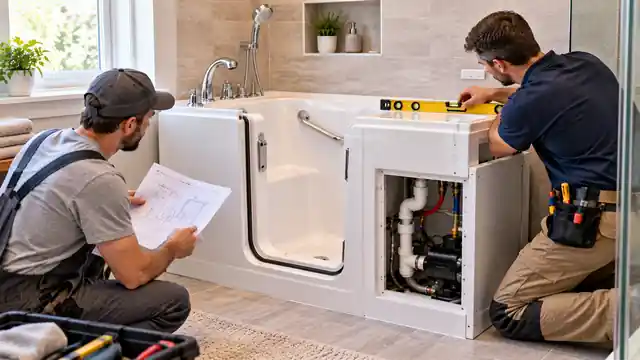
Behind the panels, however, it can contain supply lines, one or more drains, a whirlpool pump, an air blower, an inline heater, electronic controls, heated surfaces and several factory cords. The tub also has to sit perfectly stable so the door seal compresses evenly and the drain works as designed.
That is why the installation should be planned around the exact tub and therapy package, not around a generic “standard walk-in tub” assumption.
Walk-in tub installation at a glance
| Stage | What must be confirmed | Who usually handles it |
|---|---|---|
| Model selection | Dimensions, door side, drain side, therapy package, fill volume | Homeowner + dealer/contractor |
| Bathroom survey | Doorway, alcove, access path, floor condition, service-panel clearance | Installer / contractor |
| Plumbing plan | Hot/cold supply, drain size/location, faucet connection, shutoffs | Licensed plumber |
| Electrical plan | Voltage, circuit count, amperage, GFCI, panel capacity, outlet location | Licensed electrician |
| Set and level | All leveling feet supported, tub stable in both directions | Installer |
| Connections | Supply, drain, electrical, grounding/bonding as required | Plumber + electrician |
| Testing | Fill, static leak test, jets, heater, drain, GFCI, door seal | Installer + trades |
| Finish work | Panels remain removable; trim does not block service access | Contractor |
1. Choose the exact model before rough-in
The single most important installation decision happens before any pipe or wire is moved.
You need the final:
- model number;
- tub dimensions;
- door orientation;
- drain orientation;
- faucet package;
- therapy package;
- heated-seat or other electrical options;
- service-panel location.
Optional equipment can change the circuit count, cord layout and service space. Drain orientation can change the plumbing route. Door orientation can change how a wheelchair user approaches the seat.
Download the current specification sheet and installation manual for the exact model and configuration you are buying. The final drawing controls outlet, drain, supply and access locations.
If you are still deciding between models, start with our walk-in tub dimensions and bathroom-fit guide and door types guide.
2. Make sure the tub can physically reach the bathroom
A tub that fits the alcove can still be impossible to deliver.
Measure the entire path:
- front or garage door;
- hallways;
- interior doors;
- stair landings;
- tight turns;
- bathroom doorway;
- clearance around vanities, toilets and trim.
Use the shipping and cabinet dimensions, not just the nominal installed size. Some tubs can have removable panels or doors for delivery, but never assume parts can be removed unless the manufacturer says so.
Protect the tub during delivery
Manufacturers commonly warn installers not to lift a walk-in tub by faucets, plumbing, pumps, hoses or door hardware. The frame is the structural lifting point.
Acrylic air jets and fittings on the underside can also be damaged if the tub is dragged or temporarily set down on the wrong surface.
3. Check the floor before setting the tub
A walk-in tub can hold a large volume of water plus the bather and the tub itself.
The subfloor should be:
- sound;
- flat enough to level the tub correctly;
- free of rot or water damage;
- capable of supporting the filled fixture;
- ready for any required anchoring.
If there is visible bounce, sagging, old water damage or questionable framing, solve that before installation.
This is particularly important in older homes and second-floor bathrooms. Do not assume that because a standard tub sat there previously, the existing floor is automatically suitable for a deeper walk-in tub.
4. Leveling is a functional requirement, not a cosmetic detail
Walk-in tubs are normally leveled using adjustable feet or a frame system specified by the manufacturer.
Proper leveling affects:
- door seal compression;
- drainage;
- frame stability;
- waterline appearance;
- stress on plumbing connections.
Ella’s current installation guidance specifically requires the tub to be leveled before drain and supply connections are finalized. Its support material also identifies loss of level as a possible cause of door leakage.
Every foot needs support
A tub can read level on the deck and still rock if one leveling foot is not carrying weight.
The installer should verify:
- level front-to-back;
- level side-to-side;
- every foot firmly contacts the subfloor;
- the tub does not rock;
- any manufacturer-required anchoring is completed.
5. Plan the drain before the tub is trapped in place
Drain layout is one of the easiest areas to underestimate because working space can become very limited once the tub is in the alcove.
Current Ella guidance, for example, tells plumbers to plan the house drain before the tub is set and then make the final connection after leveling. Some Ella families use dual drains while certain models use a single 2-inch drain, so even within one brand the configuration can differ.
Check:
- manufacturer drain size;
- drain side;
- house drain location;
- venting;
- available slope;
- clearance under the tub;
- whether the project is over a wood floor or slab.
Concrete slab installations need early planning
A slab bathroom can work, but the plumber needs to know where the house drain comes up and how the new line reaches the tub without creating a clearance problem.
Do not wait until delivery day to discover that the new drain needs concrete work.
6. Water supply and faucet requirements
The hot and cold supply has to match the actual faucet package.
A walk-in tub benefits from good flow because the user sits inside while the tub fills. That makes undersized or poorly routed supplies more noticeable than they might be on a shallow standard tub.
Before installation, confirm:
- hot and cold shutoff locations;
- supply-line size recommended by the manufacturer;
- faucet connection type;
- available household pressure;
- whether a thermostatic valve is included;
- whether the water heater can supply the required hot-water volume.
For the water-heater side of the project, see our walk-in tub water-heater, fill and drain guide.
7. Electrical requirements depend on the therapy package
A basic non-powered soaker can be much simpler electrically than a tub with whirlpool, air massage, heated surfaces and microbubbles.
Current Ella guidance shows why the exact package matters: powered Ella tubs use dedicated GFCI-protected 120V circuits, commonly 20A, and the number of circuits follows the installed therapy equipment. Its Flow model and certain non-pump configurations have different requirements.
Other manufacturers publish their own electrical schedules.
What the electrician should confirm
- voltage;
- required amperage for each circuit;
- number of dedicated circuits;
- GFCI protection;
- grounding/bonding requirements;
- breaker-panel capacity;
- receptacle location;
- service access after finish work.
Never solve an outlet-location problem with an extension cord or power strip.
We cover this in detail in our walk-in tub electrical requirements checklist.
8. Keep the service panels accessible
This is one of the most important long-term installation details.
Pumps, blowers, heaters, control boxes, valves and plumbing unions eventually need inspection or repair. A beautifully tiled installation can become an expensive service problem if the access panel is permanently covered.
Before walls, panels or trim are completed, identify:
- pump access;
- air-blower access;
- electrical/control-box access;
- drain access;
- faucet/supply access;
- GFCI reset/test access where applicable.
The repair implications are explained further in our walk-in tub repair and troubleshooting guide.
9. Do a complete leak test before closing the walls
Do not assume a dry floor after a five-minute fill proves the installation is finished.
A useful commissioning sequence is:
- Inspect all visible connections while dry.
- Fill the tub with therapy systems off.
- Watch supply and drain fittings.
- Let the tub stand full long enough to reveal slow seepage.
- Operate each water-based therapy system separately.
- Check pump and heater unions while running.
- Operate air systems and other powered features.
- Drain the tub while watching the drain connection.
- Inspect the door perimeter and floor.
- Only after successful testing should access areas be closed.
Take photos of the equipment compartment, drain connection, electrical outlets and serial/model label before the panels go back on. Those photos can be extremely useful years later during service.
10. Test the GFCI and every powered feature
The installation is not complete just because the pump runs.
Verify:
- each required GFCI can be tested and reset;
- breakers are labeled;
- whirlpool pump runs normally;
- air blower runs normally;
- inline heater functions as designed;
- heated-seat/back system works if fitted;
- microbubble system works if fitted;
- automatic purge operates if the tub uses it;
- powered drain works if included.
A feature that was not tested on installation day can become a warranty dispute later.
11. Door operation should be tested with the tub level and dry
Before the first bath, check that the door:
- opens through its full intended range;
- does not strike the toilet, vanity or wall;
- latches without excessive force;
- compresses the gasket evenly;
- can be operated by the actual user.
This last point matters. A technically successful installation can still fail the accessibility goal if the user cannot reach or operate the latch comfortably.
12. Verify grab-bar and seat usability after the tub is installed
Do not evaluate only the plumbing.
Have the intended user—or someone with a similar reach and mobility profile—check:
- step-in height;
- seat height;
- seat depth;
- grab-bar position;
- handshower reach;
- faucet/control reach;
- door-handle reach;
- space to stand and transfer outside the tub.
If wheelchair transfer is important, the transfer path should have been planned before purchase. A standard inward-swing door and a transfer-style door solve different problems.
13. How long does walk-in tub installation take?
There is no universal installation time.
A straightforward replacement in an already suitable alcove can move quickly. A project can take much longer if it includes:
- moving drains;
- new dedicated electrical circuits;
- panel upgrades;
- subfloor repair;
- doorway widening;
- wall reconstruction;
- tile work;
- concrete slab modifications;
- water-heater upgrades;
- permit or inspection scheduling.
Ask the contractor for a sequence, not just a promised finish date.
14. What does walk-in tub installation cost?
Installation cost varies because the tub itself is only one part of the job.
Major cost drivers include:
- demolition and disposal;
- plumbing relocation;
- electrical circuits or panel work;
- floor repair;
- doorway modifications;
- wall and tile finishing;
- water-heater work;
- permit/inspection fees;
- local labor rates.
For detailed cost planning, use our walk-in tub cost guide. When comparing quotes, ask for the tub, plumbing, electrical, demolition and finish work to be separated so you can see what is actually driving the price.
15. DIY installation: possible does not mean simple
Some manufacturers allow owner-arranged or DIY installation, but that does not eliminate licensed-trade requirements or local code.
Ella’s current support guidance, for example, says owners may arrange their own installer and that correct installation—not the installer brand—is what matters for its parts warranty. At the same time, it specifically requires the electrical circuits to be installed by a licensed electrician and the tub to be level, watertight and unmodified.
A realistic DIY decision should consider whether you can safely manage:
- moving a large fixture;
- floor preparation;
- exact leveling;
- drain alignment;
- water-pressure connections;
- wall/flange finishing;
- coordination with licensed electrical work;
- full leak and function testing.
For most households, the highest-value role is careful project management rather than personally doing every trade.
16. Installation red flags
- The installer has not asked for the exact model or spec sheet.
- Drain work is being planned after the tub is already trapped in place.
- The tub rocks slightly but is called “good enough.”
- Powered equipment is planned on an existing shared bathroom outlet without checking the manual.
- No one has checked breaker-panel capacity.
- Extension cords or power strips are proposed.
- The service panel will be tiled over.
- The installer wants to modify or cut the tub frame without manufacturer approval.
- No full-water leak test is planned.
- The quote says “complete installation” but excludes electrical, plumbing relocation or finish work without explaining it.
17. Pre-installation checklist
| Item | Confirmed? |
|---|---|
| Exact model and final therapy package selected | ☐ |
| Door side and drain side confirmed | ☐ |
| Delivery path measured | ☐ |
| Bathroom alcove dimensions verified | ☐ |
| Floor/subfloor condition checked | ☐ |
| House drain location and route planned | ☐ |
| Hot/cold supplies and shutoffs planned | ☐ |
| Water-heater capacity checked | ☐ |
| Electrical circuit count/amperage confirmed | ☐ |
| Panel capacity checked by electrician | ☐ |
| Service access will remain removable | ☐ |
| Permits/inspection requirements checked | ☐ |
| Installer scope and exclusions written into quote | ☐ |
18. Installation-day checklist
- ☐ Inspect tub for shipping damage before installation.
- ☐ Move tub by the frame, not plumbing or door hardware.
- ☐ Confirm correct door/drain orientation before final placement.
- ☐ Level front-to-back and side-to-side.
- ☐ Confirm every leveling foot carries weight.
- ☐ Connect drain only after leveling.
- ☐ Connect hot and cold supply and test for leaks.
- ☐ Complete licensed electrical work.
- ☐ Test every GFCI.
- ☐ Fill tub fully and perform a static leak test.
- ☐ Operate each therapy system.
- ☐ Drain while watching connections.
- ☐ Test door/latch operation.
- ☐ Photograph service compartment and model/serial label.
- ☐ Refit panels without blocking future access.
Frequently asked questions
Can a walk-in tub replace a standard 60-inch bathtub?
Often, yes, because many models are designed for common alcove footprints and can use extension panels to fill unused space. But the exact tub width, depth, door swing, drain orientation and service access still need to be checked against the room.
Does a walk-in tub need a special drain?
It needs the drain size and configuration specified by that model. Some tubs use one drain, others use dual drains or quick-drain systems. The house plumbing also has to provide adequate slope, venting and capacity.
Does every walk-in tub need an electrician?
A truly non-powered soaker may not need tub-specific electrical work. Any tub with pumps, blowers, heaters, powered drains or electronic controls should have its electrical requirements reviewed and installed according to the manufacturer’s manual and local code.
Can a walk-in tub be installed on a concrete slab?
Yes, many can. The key is planning the drain route and clearance before the tub is set. Depending on the existing plumbing, slab work may or may not be required.
Can I install a walk-in tub myself?
Some manufacturers allow owner-arranged installation, but local plumbing/electrical rules still apply and powered tubs commonly require licensed electrical work. Incorrect leveling, drain work or service access can cause expensive problems later.
Should the tub be tested before the walls are finished?
Yes. Fill the tub, inspect every connection, operate each therapy system, test GFCI protection and drain the tub while the service areas are still visible. Closing walls first makes leaks much harder to diagnose.
Official manufacturer resources used for this guide
- Ella’s Bubbles — Walk-in tub installation sequence
- Ella’s Bubbles — Plumbing, electrical and space requirements
- Ella’s Bubbles — Drain connection and leak-prevention guidance
- Ella’s Bubbles — Electrical requirements by model
- KOHLER Walk-In Bath — Owner and installation FAQs
- American Standard — Walk-in bath owner and installation manual
Next, compare the installation requirements with our cost guide, dimensions guide, electrical checklist, and walk-in tub buying guide.